Where It All Started, Part II

Tags

, , , ,

This is the second half of my previous post, a tour through Narnia, now that we’ve been living with it for a couple years.  Picking up where we left off, let’s head through the Wardrobe into Narnia proper.

DSC_3715

Because we were working with a floor plan as opposed to having an entire world, certain elements of Narnia were treated with some artistic license.  Our Wardrobe is in Cair Paravel instead of Spare Oom, and our Narnia is a combination of Lantern Waste and the “Dawn Treader.”  However, just like the original Narnia, we have our resident Aslan!

DSC_3716

The window lets in light for playtime and has blackout curtains for nap time.

DSC_3721

The boys’ side of the room gives a glimpse of the portholes in between the berths as well as the crown-embellished “sail” curtains made of drop cloths.

DSC_3718

A large hunt cabinet with a dragon reminiscent of Eustace holds farm clothes for when the grandkids visit.

DSC_3719

The quote over the door comes from “The Voyage of the Dawn Treader” and perfectly summarizes my hopes in creating Narnia in our attic.

DSC_3720

The grandkids love staying in Narnia.  Whether it’s a new book to read, a dark berth for a nap, dress-up clothes in the Wardrobe, or simply room to let their imaginations run free, there’s always something here for them.  If it’s been a while since they’ve visited, they’ve been known to ask their parents when they can go to Narnia again.  We just love the fact that we’re making so many memories together!

Where It All Started

Tags

, , , , ,

This blog started with us creating Narnia in our attic.  It’s been a couple years since then, and Narnia is well-loved and well-lived-in by our three grandchildren.  Now that it’s not brand new, it seemed like a good time to revisit it and see how it’s worn, so to speak.

Heading up the stairs–Aslan’s Tent is on the right, the rest of Narnia on the left.

DSC_3698

The door to Aslan’s Tent.

DSC_3722

I like to say that Aslan’s Tent is done in Rococco-Morocco style.

DSC_3699

DSC_3700

DSC_3702

I had the builder add a small window at the top of the stairs to give a sneak-peek at Narnia, and I think the Gothic touch fits Cair Paravel.

DSC_3706

Unlike the books, our Wardrobe is located in Cair Paravel because, after all, this is a floor plan in a house–not an actual world!

DSC_3723

Although the books never mention it, I’m sure there was a Library in Cair Paravel, because every castle must have a library.

DSC_3707

DSC_3709

Around the corner of the left-hand edge of the above photo is the door to The Lodge.

DSC_3710

Inside, The Lodge should meet the approval of any dam-building rodent!

DSC_3712

DSC_3711

DSC_3714

DSC_3713

Across Cair Paravel is Spare Oom, which is more in its craft mode now (meaning a mess) than its guest room mode.  But it does clean up nice.

DSC_3703.JPG

Word Press seems to have choked on all these photos, so I’ll wait for the next post to go on through the Wardrobe into Narnia proper.


Treasure Chests for a King and Queens

Tags

, ,

For our grandchildren’s birthdays this year, I made each of them a treasure chest that we could decorate together.

DSC_4832 I started with three plain wooden boxes from Hobby Lobby and these paints and stains, plus the Glitter Blast Sealer which you need to use on top of the Glitter Blast paints to keep the glitter from flaking.

DSC_4843 This is the box for our eldest granddaughter painted robin’s egg blue inside and out with some leftover spray paint.  After that I sprayed it inside and out with Sparkling Waters Glitter Blast.

DSC_4836 Here is our grandson’s chest stained with Minwax English Chestnut outside and sprayed with Sapphire Shimmer Glitter Blast inside.

DSC_5274 Our youngest granddaughter’s box was painted with leftover lavender spray paint, then coated inside and out with the Grape Glitz Glitter Blast.

DSC_5400 I had several bowls of treasures for the kids to choose from to decorate the tops of their boxes–polished agates from West Texas, seashells, and plastic jewels.  They each chose their favorites, and then directed me where they wanted them glued on their box.  I did the gluing with E6000 so they would not get glue on their skin.  Here the box is decorated . . .

DSC_5886 and finished, with three coats of clear glossy acrylic spray to protect the decorations.

DSC_5401 Decorated . . .

DSC_5884 and finished.

DSC_5415 Decorated . . .

DSC_5875 finished, and being enjoyed.  Besides serving as a place to store secret treasures, each box is a visual and tactile delight.

DSC_5878 The older kids enjoyed checking out their finished treasure boxes, too.

DSC_5880 Sorry you can’t peek inside, but the royal treasures must remain incognito!

A Promise and a Fairy Treehouse

Tags

, , , ,

My poor granddaughter has been so patient with the extremely slow progress on the dollhouse.  She recently asked me when she could play with it, and I told her I’d make her a dollhouse she can play with right now.  She thought a moment and asked, “Would it be as big as me?”  “Almost,” I told her.

I had already found this idea online for a treehouse dollhouse; I just needed to figure out an easier way to make the tree trunk.  And then I found this great tutorial for making tree bark out of tin foil, masking tape and paper towels.  The tutorial came from this website, which uses a slightly more traditional version of papier maché.  So Mimi’s Cave in Spare Oom once again became a construction zone, this time of the woodland sort.

DSC_5277 I started with papier maché boxes from Hobby Lobby which I spray painted a warm white inside.

DSC_5282 A string of tiny, battery-operated LED lights made a quick, easy way to light the treehouse.  I used an ice pick and then a letter opener to poke holes in the back of the treehouse to thread the light string through.  Then I cut out a round window for each room.

DSC_5286 Next I glued the rooms together using a tube of quick dry glue to avoid white glue which would have dampened the papier maché and to provide a stronger, more flexible bond than hot glue.  A plywood base provided a stable surface to glue the entire treehouse onto.  Once the rooms were glued together, I decorated them–although it would have been easier to reverse the steps.  The kitchen floor was made of scrapbooking paper sprayed with a satin acrylic spray, while the living room floor was made of thin craft sticks glued onto a scrapbook paper template and pressed under heavy books until dry.

DSC_5300 One 300 foot roll of cheap aluminum foil was more than sufficient for the entire project.  I crumpled bits to fill in all of the square crevices and to round off all the corners of the boxes to create a more rounded tree.  I tore off a sheet of aluminum foil longer than the treehouse was tall, then crumpled it into a long piece, which was then hot-glued to the boxes.

DSC_5322 Shorter lengths of foil were easy to glue around the windows and to fill in any gaps between vertical “runs” of bark.

DSC_5346 Once the foil bark was glued on, it was time to cover it with masking tape.  One large, cheap roll was more than enough.  The masking tape needed to cover the foil so that the papier maché would adhere to it.

DSC_5371 Next, a coat of brown acrylic paint went onto the tree and the base board.  One large bottle of paint was more than enough.  Bits of white peeked through the brown, but the next step would take care of that.

DSC_5374 I then brushed dark Minwax stain onto the entire tree.  It ran down into the crevices and helped fill in any tiny white gaps that the brown paint didn’t cover.  I used paper towels to soak up any excess that pooled at the bottom.  After each side was glazed, I gently dabbed over it with an absorbent rag to remove some of the glaze on the protruding areas, leaving more contrast with the crevices.

DSC_5386 When everything was dry, I sprayed two coats of matte acrylic sealer over the tree to tone down any shininess left from the Minwax glaze.  I used Aleene’s extra tacky glue to apply sheet moss around the base of the tree to serve as grass, adding small flat stepping stones.  Then I cut apart a grapevine wreath and hot-glued pieces of it to the tree to serve as vines.  I cut apart a bouquet of small pink silk roses and wove them into the grapevine.

DSC_5395 The final touches were bouquets made of small blue silk flowers and tiny mushroom birds glued here and there.  A tiny wooden mouse nestled in a hole at the base of the tree.

DSC_5388 The treehouse was finished and ready for its fairy occupants and their furniture.  The house was almost completely furnished with extra dollhouse things I’ve collected over the years.

DSC_5389 A dainty fairy stands outside the kitchen and living room.  You can see the mini grapevine wreaths that serve as interior window frames.

DSC_5391 Two bedrooms grace the second level, one for the grown-up fairy and one for the little one and her fuzzy bear friend who is taking a nap.

DSC_5393 On the top level is a bathroom, which has a rooftop garden on top of it, and an open air laundry room, complete with tiny clothespins to hold the lace curtain the smallest fairy is hanging up to dry.

DSC_5399 The fairies seemed very happy, but my creation still had to pass the acid test.  What would the grandkids think?  They were here this weekend, and I can safely say that the treehouse passed with flying colors!  I was thrilled that the promise I made to my granddaughter was fulfilled with such success in her eyes.

For Narnia . . . and the South?

Tags

, , , ,

At the beginning of the book “Prince Caspian,” the Pevensie children were waiting for a train to return them to boarding school.  Instead, the train whisked them back into Narnia.  Since our grandson loves trains, a train seemed the perfect Narnia-themed Christmas present for our grandkids.  Last fall when I was stymied by an electrical problem on the dollhouse, setting up a train provided a welcome break.  And that is how Narnia went South, into our basement.

DSC_3946

After lots of research online, I found the Bachman Overland Limited HO train set on Amazon.  It has one of the few suitably old-time steam engines of all the trains I looked at, as well as plenty of cars and track.

DSC_4110

We considered building a train table, but in the end Didi drove out to the mall and brought home a ping pong table.  It was a major job to put it together, but he got it done!

DSC_4124

Meanwhile, I prepared the train board.  When I was little, we used a heavy gray paper board into which we “nailed” tiny railroad spikes to hold the track in place.  Our train came with E-Z Track, a raised plastic roadbed with the track mounted to it.  A 4′ x 8′ sheet of plywood provided the most stable surface for the train.  I spray painted it brown, then sprayed patches of green over the brown to give a realistic earthy appearance.  Misty served as Quality Control.

DSC_4230

Every train needs a tunnel through a mountain.  First I formed a tunnel out of chicken wire and curved it to fit the track, making sure the train could go under it.

DSC_4248

I used craft store plaster strips (similar to old-fashioned cast material) soaked in water to cover the sharp chicken wire.

DSC_4252

Using cardboard box cut-outs for a base–not under the tunnel, of course–I added lots of brown wrapping paper, held in place with masking tape, to build the mountain around the tunnel.  I made sure to keep everything uneven and mountainous-looking and poked in a few holes for caves.  Once the structure was formed, I began covering it with strips of the plaster fabric soaked in warm water.

DSC_4266

A rubber kitchen glove on the hand doing the smoothing prevented me tearing up my fingers.  I had to work fairly quickly, but I was able to shape the mountain as I worked.  You can see one of the “caves” at the bottom.

DSC_4274

This process took several days because the plaster had to dry after the tunnel was formed and after the mountain was finished.  I took advantage of a dry warmish day outside to spray paint the mountain with the same brown and green paints I had used on the base.  After giving the mountain an all-over coat of brown paint, I used short, light bursts of green to “dab” the paint on here and there, avoiding making the mountain too green.

DSC_0959

The beautiful Davis Mountains in Far West Texas, our beloved family vacation spot for many years, were the inspiration for my mountain’s terrain and color.

DSC_1041

Sparkly rocks brought back from West Texas added texture, interest and a nostalgic element to the mountain.

DSC_4500

On Christmas morning we gave the children the empty train box and sent them on a treasure hunt to find out what had happened to the rest of the train.  After some excited exploration of the house, we “helped” them find the basement door, and they hurried excitedly downstairs.

DSC_4507

It didn’t take long before the train was chugging through the tunnel, to their delight.

DSC_4509

Even the youngest got to play “Engineer.”

DSC_4510

A new LED-lighted barn ornament provides shelter for the very old painted lead livestock from my childhood train set.  A few cows suffered broken legs through the years, so I made a pasture with hobby store grass on a cardboard form, added a lichen hedge, and glued the animals permanently out to pasture.  Sticks, lichen and hot glue made a grove of trees to shade the farm, and a new toy tractor stands in for Didi’s Kubota.

DSC_4511

The old paper houses of childhood memory were grouped into a village at the foot of the mountain with the well-worn train station a short drive away.  This layout was not a labor of model train artistry, but rather a labor of love to give joy to our young grandchildren.  Hopefully, as they grow we can add together to our tabletop Narnia of the South.

Back at Work

Tags

, ,

It has been a VERY long time since I’ve worked on the dollhouse.  The farm has taken up more of my time this past year as my husband was finishing his third year of a counseling master’s degree along with a full-time internship.  When he graduated in May, I got him busy working on my huge “Honey Do” list, which lasted most of the summer.  Now he’s gotten it mostly done and has started his first counseling job.  So I am finally getting back to work on the dollhouse in Narnia!

I left the dollhouse so long ago with the exterior siding repaired and (finally) primed correctly, with an oil-based primer.  The inside remained untouched and neglected . . .
DSC_2274

The first thing I did was to stain the floors of the first and second stories of the house.  I plan to cover them with narrow floorboards, but there are bound to be tiny gaps.  A dark stain underneath will make them look more realistic than if I left the white pine showing through.

The second step was to prime the interior with the same oil-based primer.  I started up in the attic and primed the ceiling, walls, and floor–because I intend to cover it with “linoleum” instead of wood flooring.

I stained the staircase, too, and set it in place to see how it looks.  Well . . . no real-life mother in her right mind would let any child she cared about go up or down THAT staircase, but this is the world of dolls where no child ever falls and gets hurt and mothers don’t have to worry!  🙂

DSC_2276

Back to the priming–you’ll notice that I opted to use a disposable paintbrush because I’m lazy and HATE cleaning oil-based paint out of expensive paintbrushes.  I’ve finally learned that I won’t do it, and I’ll just have to throw them away–so now I buy disposable ones to begin with!

DSC_2279

When I was ready to start priming the walls of the first and second stories, I needed to protect my stained floors from the primer.  I knew that the spaces were too tiny to effectively put down masking tape, so I came up with another solution:  scrapbooking pages.  I have bought many scrapbooks that had white pages in them that I removed to replace with colored paper.  Being a bit of a pack rat, I kept all those white pages because I knew they would come in handy some day.  Well, Some Day had arrived!

DSC_2277

Once one side of a room was painted, I put a new, un-painty scrapbook page in the other half and held it down as I painted along the edge of the floor.  I used 8 x 8 pages in the small rooms and 12 x 12s in the large rooms.

DSC_2278

Any little smears of white paint were easily wiped away with my still-damp stain-wiping rag, and everything ended up looking pretty good.

DSC_2281

Now that the painters were temporarily done, it was time to call the electrician!

Weathering the Storm

Tags

,

It’s been three months since I worked on the dollhouse.  Since the last post about the ripples that appeared after I painted the siding, things got even worse as the paint dried.  I was so discouraged that I just didn’t know what to do, so I did . . . nothing!  But poor little Charis is longing to play with the dollhouse, so I just had to get back to it.

DSC_9635
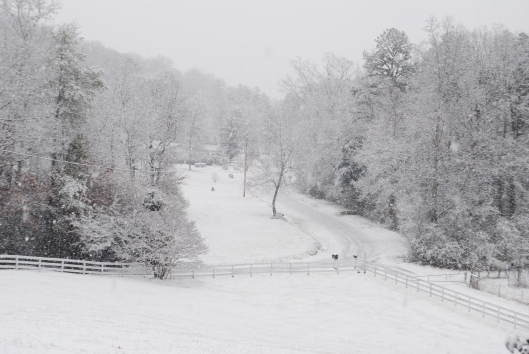
Yesterday it snowed and again today, so it seemed like a good time to get to work.

DSC_9591
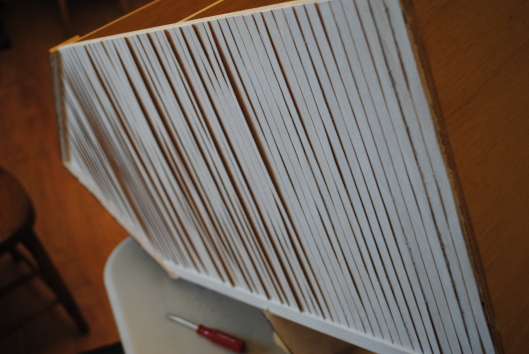
You can see what a mess I had to work with.  Here’s the solution I devised:

DSC_9597

I had already bought a mini hot glue gun, and I gathered some potentially useful tools to go with it:  A plastic pot scraper, a small screwdriver, a paint can opener and a staple remover.

DSC_9598

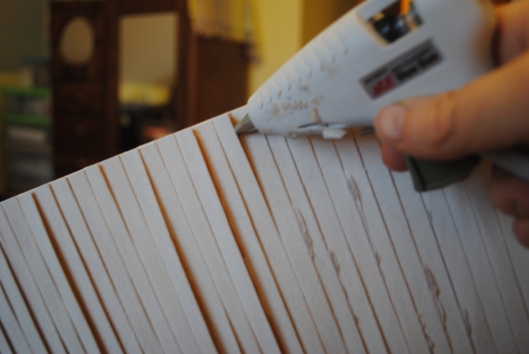
I began by inserting the tip of the hot glue gun into a crevice under a siding board and running one third to halfway along the board.  Any more than that was too much to press down until the glue cooled.

DSC_9594

Fingers were the first tool I used to press the glue down.  The danger, of course, is coming in contact with the hot glue which is hot enough to blister skin.  So I tried various other tools for the job:

DSC_9601 DSC_9602


DSC_9599

DSC_9604

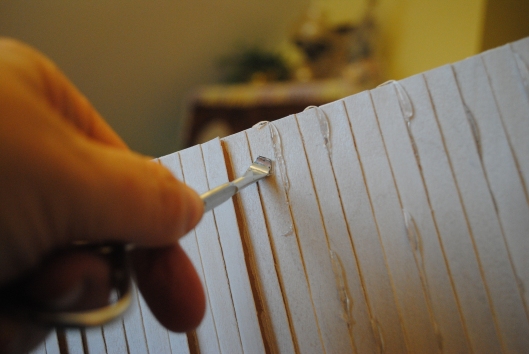
In the long run, the business end of the staple remover worked best.

DSC_9592

The first day I worked, I removed the excess glue as soon as it cooled enough to touch.  This was not a good idea, as you can see from the photo above.  Hot glue needs to cool completely before the excess is removed, or it is almost impossible to remove.

DSC_9610

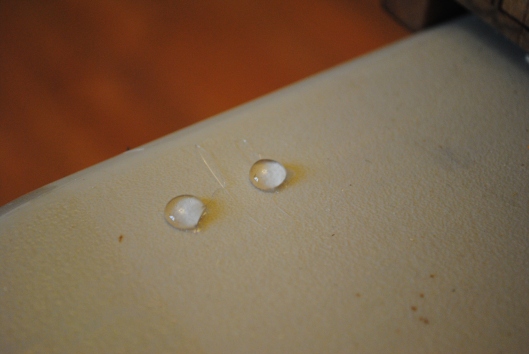
Here’s an experiment I did to prove the point:  two blobs of hot glue on the plastic table, a surface that will be easier to clean than wood.

DSC_9612

As soon as the glue cooled, I began to remove one blob.

DSC_9613

Even when I managed to scrape it away with much effort, some still adhered to the table.

DSC_9617

A couple hours later after the second blob had set, it peeled off easily without leaving a residue.

DSC_9615

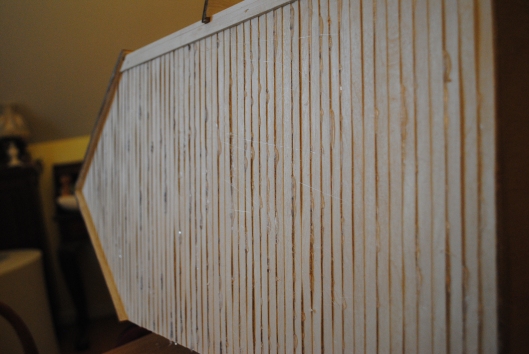
So when I finished gluing one side of the dollhouse, I LEFT IT ALONE!

DSC_9603

I didn’t even pull off the temptingly fragile cobwebby strands that formed.

DSC_9616

It looked really horrible, and it was VERY hard to leave it alone!  But I did.  I glued the second side and a bit of the front and then . . .

DSC_9631

I unplugged my glue gun and went away overnight.  Always, always unplug the glue gun, even if you think you are just leaving for a few minutes.  You might get distracted doing something else and forget to return and unplug it.

DSC_9622

When the snow turned to nasty freezing rain this afternoon, I was glad to head upstairs and begin carving excess glue off my siding.  First I slipped an Exacto knife under the side of the glue and sliced it free from the siding.

DSC_9620

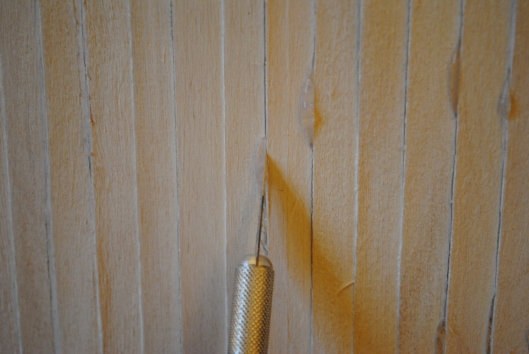
Next I held the knife vertically and sliced down to the siding.  This was a very tedious job which I did with extreme care, both for my fingers and the fragile siding.

DSC_9626

Once the glue was sliced loose, it was easy to peel it away.  If there was any residue left, I found the small screwdriver extremely helpful in scraping it away.  Sometimes a thumb nail worked well, too, but the screwdriver has the advantage of not getting sore!

DSC_9644

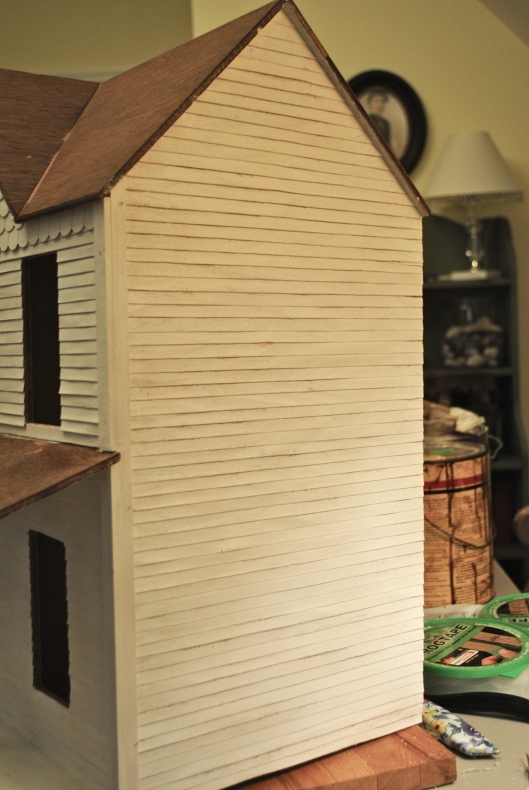
After several hours of steady labor, one side was finished.  It doesn’t look near as good as it did before I painted the siding in the first place, but it’s a far sight better than what it looked like yesterday!

DSC_9650

When I looked out the window I was astonished to see that the freezing rain had turned back into snow, which was falling heavily in giant flakes, creating a real winter wonderland outside.  Although the evening light was really blue, I was personally feeling a whole lot less blue!  It looks like the dollhouse and I might both come through the storm okay.


The Ripple Effect

Tags

, ,

Monday I painted and stained the dollhouse.

DSC_6647
On the roof, I used the stain left over from the woodwork in Narnia, applied it with a rag (using plastic gloves), and touched up with a brush.  Then I wiped it with another rag to even out the color.  I then turned a glove inside out over the stain-filled rag and twisted it shut.  That way it’s ready to go if I need to touch anything up.  The roof will get shingles, but the stain on the base helps hide any gaps between shingles.

DSC_6648
Here’s what it looked like when I finished the roof.

DSC_6654
Next I primed the siding, again using leftover primer from Narnia and a soft, narrow artist’s brush.

DSC_6652
I sat down to paint so I could see up under the boards and make sure I covered everything.  When I got to the first floor of the house, I tipped the house back using a Kleenex box so I could make sure everything got covered.  Occasionally it was necessary to brush upwards to get the line underneath each lap board covered.

DSC_6649Once I had the tricky little parts done, I tried using a larger brush to make things go quicker.  I quickly decided that the larger brush put too much paint on, so I abandoned it.

DSC_6651
You can already see a problem developing . . .  The lap siding began to ripple.  Even though my primer was older and fairly thick as opposed to being very liquid, the water content made the siding more ridgy than Ruffles!

DSC_6655
So I placed the house on my wooden board to try to flatten one side then covered the top side with plastic and weighted it down.  Then I abandoned it for the rest of the week.

DSC_6669
The great reveal on Friday shows that the front of the house doesn’t look too bad . . .

DSC_6671
. . . although a close-up under the window reveals some rippling.

DSC_6672
The sides are the part that doesn’t look so good.  It’s SO disappointing after putting so much work into it!  Before I put the exterior color on, I need to do some research.  Better late than never, I guess!

The House of Three (Thank Heaven It’s Not Seven!) Gables

Tags

,

Thank heaven this house doesn’t have seven gables!  There’s a gable on each side of the house, and I figured out a plan for siding those back in June.

DSC_5162The last time I worked on the dollhouse was in September when I sided the downstairs half of the front.  The procedure I used is explained in a previous post.

A week or so ago I applied the upstairs siding to the point where the gable started, and then I stopped.  I knew I wanted to do something different with the gable.

DSC_2352

I wanted to use fish scale shingles, just like on this house, a retreat for pastors and missionaries that we maintain on a farm in Alabama.  The dollhouse shingles arrived by UPS, and it was time to get to work.

DSC_6557

The first step was to make a template and apply spray-on adhesive to the face of it.

DSC_6560

The next step was to apply the first row of shingles across the bottom of the template, laying them on the glue-y side.  Here I’ve turned the template over to be sure the shingles are on straight.

DSC_6563

Subsequent rows of shingles went on, staggering the slits between the shingles.  Having learned from the roughness of my lap siding, I ordered laser cut shingles.  I did NOT want to have to sand every single shingle!  Once all the rows of shingles were applied to the glue-y side of the template, I began to trim the excess off the sides with a scissors.

DSC_6565

The “gable” looked really nice.  But when I peeled the template off the shingles, that is when things started to fall apart.–literally!  The glue was not strong enough to hold the sections of shingles onto the template, and pieces fell onto the table.  I could have pieced the shingle strips and pieces onto the gable of the house without any problem, but I realized that something was missing.

DSC_6568

I needed a narrow row of shingles to partially cover the last, full-width piece of lap siding.  The overhang of the shingles I had glued onto the template was not enough.  So I drew a line across a strip of shingles, cut down the excess across the top, and glued it overlapping the siding.

DSC_6569

That messed up the cuts I had made with my template, and I had to kind of “wing it” from there.  However I was able to use the template as a guide and make adjustments as I went.

DSC_6570

It was a very laborious process, and I learned a few things the hard way.  One was this:  After I trimmed a length of shingles to size and fitted it in place, I needed to draw a line across the top.  Before I learned that, when I removed a strip to apply the hot glue, I accidentally got it on crooked.  I had to pry off a whole row of shingles, and as they came up they tore off some of the ones underneath them.  Fortunately, because of the almost-separate nature of the shingles, it was relatively easy to rip one or two off without removing a whole row.

DSC_6571

Another thing I learned was that after I had marked a strip of shingles where it needed to be cut, I cut it a little wider than I thought I needed.  It was easy to trim more off–but if I discovered it needed to be wider, it was impossible to replace what was already trimmed off!

DSC_6572

Finally, I learned that when I was cutting close to the slits between shingles, I needed to apply a piece of Scotch tape on the back to keep the little end pieces from cracking off.  And as I trimmed them, I needed to always start my cut at the tip of the “triangle,” cutting towards the border of un-slit wood at the top of the strip.  If I cut the other way, ending with the triangle at the end of the curved shingle, a little corner inevitably cracked off.

DSC_6574

Once I had sized up visually where I thought I needed to trim, and drawn my lines in place, it was helpful to lay the piece on top of the template and check for accuracy.

DSC_6577

It took three and a half hours, but I was thrilled with the finished project.

DSC_6579

Temporarily taping the windows in place let me see how good the house looked.

DSC_6582

Probably the most difficult part of the shingle project was cutting out the round window opening.  The shingles are much sturdier than the lap siding and consequently much harder to cut through.  I could not avoid a bit of chipping around the edges of the shingles, but fortunately the nice wide trim around the octagonal window covers a multitude of sins!

Applying the siding and fish scale shingles has been a slow and tedious process, but now the fun starts–painting and decorating!

The Lion’s Pride

Tags

, ,

The grandkids were here this morning, and it was a beautiful Narnian kind of day.

DSC_6481

It was also brisk and breezy, so when they came with us to fetch the milk cow into the barnyard, they needed something to keep them warm.

DSC_6550
This called for their special Narnian jackets.  I found the sweatshirts on clearance at WalMart for $5 apiece.  I added adorable (clearance) iron-on lion patches from Hobby Lobby.  The final touch is a charm dangling from the zipper of each jacket–a nice manly-looking crown for Kol and a rhinestone-studded one for Charis.  The kids love their jackets, and I love how special they feel as members of the Lion’s Pride.  The perfect jackets for the kiddos that are Mimi’s pride and joy!